Get Out Of The Box
-

- January 1, 2012
- Pam Froman

You want your paintings to be fresh and original, but a typical rectangular canvas is just...square. So, change it up with a shaped canvas!
A shaped canvas can be round, triangular, or even abstract. It's all up to you. Aim to create movement in your work that goes beyond the traditional. Let the shape of the piece be art in and of itself.
While it is easier to use the typical rectangular surface, it actually isn't difficult to create your own shaped canvas. In fact, making your own canvases can be an integral part of your painting process.
To get started you will need the following, which can be found at hardware or art supply stores:
* Hammer
* Hand Saw
* Miter Box
* Ruler
* Protractor
* Glue
* Nails
* 1 by 3-Inch Pine
* ¼-Inch Plywood
* ¾-Inch Quarter Round
* Raw Canvas
* Gesso
The first thing you must do is sketch out the design for the perimeter of the shape. What do you want it to look like? The possibilities are endless!
Once you know what shape you’re aiming for, follow these directions:
- Using the ruler, scale everything in your sketch at a ratio of 1 inch to 1 foot.
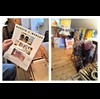
- After the design is scaled and measured, use the protractor (as seen in Photo 2) to determine the angles of your corners.
- Next, use the saw and miter box to carefully cut the 1 by 3-inch pine wood at the desired angles. The angles need to fit together smoothly in order to keep the frame balanced!
- Lay out the cut pieces on the floor and assemble them in the position of your desired shape.
- Using the 1/4 inch plywood, cut the angles to support the corners.
- Glue and nail all the parts together. The nails may have to go in diagonally to keep the pieces together. Get nails that are not too small, as you’ll need them to help anchor the wood.
- Along the outside edge of the structure, cut the ends of the 3/4 inch quarter round to the length of each side and angle the ends to fit together, then glue and nail the quarter round to the structure.
- Voila! You are now ready to stretch the canvas. So, roll out your canvas and lay the stretcher face down on the canvas sheet.
- Cut the canvas around the perimeter, leaving about 3 to 4 inches of excess fabric.
- With a staple gun, work your way around the perimeter from opposite side to side, stretching the canvas until it is tight. You may want to invest in a canvas stretcher to make the canvas ultra tight. The tighter the canvas, the smoother the work.
- Flip the shaped structure over and paint your canvas with gesso.
- Let it dry completely (usually takes a few hours) and gesso again.
- Lightly sand the surface and then, it's time to paint!